How to use your own images in a Power Presentation
There are 2 common ways to show a picture in PowerPoint. The first and most common way is that the image is inserted as a picture on the slide. The second way is to apply a picture to a shape as a picture fill. Normally, this is done to get the picture to fit into a set shape.
Replacing a picture:
 Most of the images in Power Presentations are inserted as pictures and already have styles and animations set so if you want to use your own pictures instead, just inserting them won't work.
1. Click on the image you want to swap out. if it is grouped with other items, the selection will be larger than just the picture and go over other items. Click on the picture again to select it.
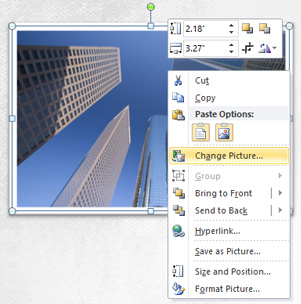
2. Right-click on the picture (on a Mac, Control-Click) to show the menu and choose
"Replace Image..."
3. Browse your computer for a new picture you want to use and click OK.
4. You may need to do some minor edits to the picture to resize it to fit the same area but the style and animation from the original will automatically be applied to your picture.
Replacing a picture fill in a shape:

If you right click on the picture and you don't get an option to "Replace Image..." then the picture was set as a fill on a PowerPoint Shape. Notice in the example that the menu is different.
1. Click on the image you want to swap out. if it is grouped with other items, the selection will be larger than just the picture and go over other items. Click on the picture again to select it.
2. Right-click on the picture (on a Mac, Control-Click) to show the menu and choose
"Format Picture..." at the bottom of the menu.
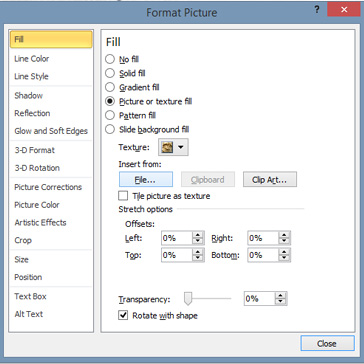
(The image below shows the Format Picture screen)
3. Click on Fill at the top left corner and under Picture or texture fill, click the File... button.
4. Browse your computer for a new picture you want to use and click OK.
5. At first, your picture will be stretched to fit in the shape. If you don't want this, check the box for
"Tile picture as texture" to reset the size and shape of your picture.
6. Now use the Tiling Options to move your picture around inside the shape. Offset X will move it left/right. Offset Y will move it up/down. Use Scale X to resize the width and Scale Y to resize the height.
7. Click close when you are done.